Story and Photos by Kate Burke
Since I started college, one thing has become very clear: space is limited. From my dorm room to my new house, I’ve struggled to find a place for all of the necessities and still maintain some style.
Thankfully, summer is here, and there is no better time to get a little crafty and express your
creativity. A homemade jewelry wall display is a unique, inexpensive way to add personality toyour room and solve your organization woes (tangled chains, anyone?)
Typical cost: $10 to $20, depending on the frame.
Time to complete: About one hour.
To get started, you will need:
- A frame with depth. The frame must have at least ¾ of an inch of space between the front (where the glass typically rests) and the back (where it touches the wall). The frame I used here was lying around the house, but I often find great deals and unique frames at Goodwill.
- A decorative piece of paper. Express yourself!
- A sturdy piece of cardboard equal to the outer dimension of the frame, or that can be cut to do so.
- Hot glue and a hot glue gun
- Wire
- Scissors
- Pliers
- Four decorative knobs. These can be found at almost any hardware store and cost about one dollar each.
- Ribbon. This is optional, but it’s an easy and attractive way to hang your project!
- Shells, or any other small, concave object (this is optional, but it can be a helpful way to store small jewelry such as stud earrings and pendants.)
Now that you have what you need…
1. Take any pictures out of your frame, and dispose of the glass and the backing—you won’t need them anymore. Determine which direction you want your frame to hang.
2. Cut two strands of wire that are double the width of the picture size your frame was meant to hold, plus an additional 2”. (For example, if my frame holds pictures 8” wide picture, I will cut three pieces of wire that are each 18” long.)
3. With the pliers, grip the middle of one wire strand. Then, bend the strand so that the two sides touch, and twist them together. Repeat with the remaining strand.
4. Turn your frame over so that you are looking at the back. In the space where you would normally place a picture, lay the two strands across the top half of your frame. If the strands are a bit too long, cut them to fit. Make sure that they are spaced evenly, and that you have left enough space between to hang your longest pair of earrings. Hot glue the strands to the frame, holding them in place.
5. If the cardboard backing is too large for the back of your frame, place the frame on the piece of cardboard and trace the silhouette. Then, cut along the traced line so that the cardboard fits nicely on the back of your frame.
6. Now, take your decorative paper and cut it to match the size of the cardboard piece. Hot glue the decorative paper to the corners of the cardboard.
7. Hot glue the cardboard piece to the back of the frame so that the decorative side is facing the front.
8. Cut four more strands of wire, each 8” long. With the same technique from step three, use the pliers to bend each strand in half and twist it together so that a large loop is left at the top.
9. On the back of your frame, hot glue two of the wire strands to each side so that about 4 inches of the wire sticks out at the sides. Again, make sure that the strands are evenly spaced.
10. Turn your frame to the front, and bend each of the four wire strands towards you so that they will come away from the wall.
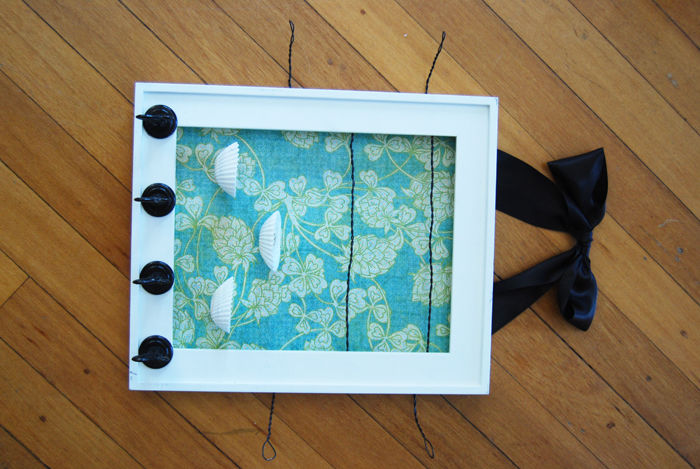
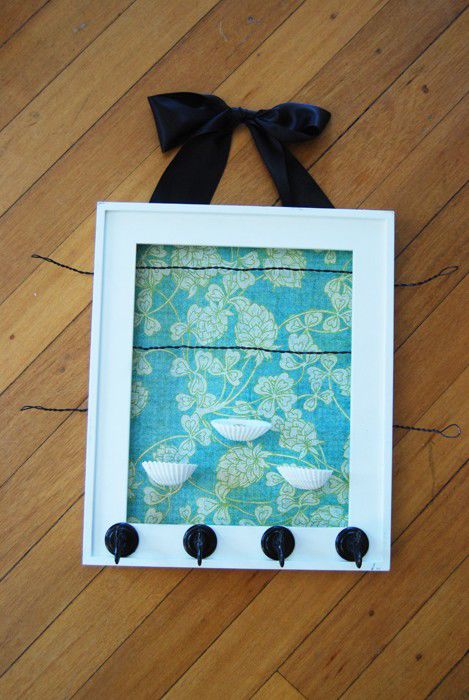
11. Frame facing the front, hot glue three shells (with the opening facing upward) evenly spaced, to the decorative paper on the bottom-half of the frame’s display opening.
12. Hot glue four knobs, evenly spaced, across the bottom of the frame.
13. Tie a bow in the middle of your ribbon, and then turn it over and hot glue the knot, holding it in place. Hot glue the ends of the bow to the back of the frame.
14. Fill it with your jewelry, and hang it on the wall!


